Download the Barco Pairing Tool
In order to pair new devices to a room, you must use the Barco Pairing Tool (BPT). The tool is available for download from the admin UI of your institute under the section Tools.
You may choose the version matching the OS of the machine on which you will run it (MS Windows or Mac OS).

Simply download it and run the executable to discover devices in your local network and then add them to your institute, as described below.
Add the devices to the network
- Unzip the Barco Pairing Tool folder on a computer
- Connect the computer to the network segment to which all devices are connected as well
Note: Even if devices have multiple network ports, the system only supports one single network connection per device. Do not swap cables after having gone through the next process, as the system configuration depends on the device’s mac address. Changing the network port impacts these settings and you will need to re-pair the device.
- Power on the devices in the room and the displays connected to them
After booting up an unpaired device, its displays shows the following window:

The actual version number mentioned depends on the installed software version.
Run Barco Pairing Tool
At this stage you can start pairing devices to your cloud hosted institute by adding them to a room in your institute hierarchy. For this, the Barco Pairing Tool (BPT) is needed.
Note: The devices have to be added to a Room during the pairing process. This implies that at least one room must be defined in your institute before you can start pairing devices.
Paired devices can always be moved to another room within the same institute after pairing, so having a fully completed hierarchy is not necessary in order to pair the devices.
- Run weConnect-pairing-tool.exe
- Fill in the administration URL of the server (e.g. [InstituteName].edu.barco.com)

- Press Connect to connect to the server
- A login screen appears: use a manager account to log in.
- Add a new device for which you will need to do the configuration (device & room)
- Add a device to replace an existing one (Reason: You did a Swap/RMA a dead unit, or your flashed/reformatted a node)
Case 1: Add a new device
- You are directed to a UI which looks almost the same as the admin UI. One difference is that the Devices tab has a second sub-tab next to Devices: Add Devices
- Open tab Add Devices
Discover and select the devices
The computer running the Barco Pairing Tool discovers the devices which are compatible with the cloud.
Note: The discovery protocol is mDNS: make sure your network switch configuration and firewall configuration allows mDNS multicasts to be received.
Note: A device can run older or incompatible firmware which does not allow it to be paired to the cloud.
If this is the case, you can reflash the device with the lastest .ISO file. See [KB12123].

- Restart scan: click this button to perform a new scan for devices. An updated list of pairable devices in your network segment is displayed
- Title: at this stage you can enter a custom title for a device. This title can be changed at any time from the Devices tab in the admin UI
- Identify: click this button to detect to which physical device the entry in the list links. As a result the string Identifying - or the assigned title, if it has been entered already - temporarily pops up on the display connected to the device
- Insert devices:
- first set the check boxes of all devices that need to be paired to a room
- then click Insert devices
- a pop-up shows the location browser: select the correct room
- click Select to pair the checked devices to the selected room.
Shortly after, the selected or default wallpaper will load. From that moment on, the device is connected to the cloud and paired to the room and it can be configured further.
- Enable remote access: this allows you to give a Level 3 Barco service engineer remote access to the device to perform analysis tasks in case the device does not function correctly on your network.
When the remote access feature has been enabled in the Features tab you can give Barco escalation support temporary access to a device for maintenance or troubleshooting purposes. For more details on this service, see [KB7719] (section Servicing).
After having added the devices to the corresponding rooms, the remaining configuration can be done either in the browser via the admin UI or in the Barco Pairing Tool.
At this stage you can manage and configure the devices from anywhere as long as you and the weConnect devices have Internet connectivity.
Case 2: Replace an existing device
Requirements:- Have one device offline (defective one) and one ready for pairing (replacement one).
- You can't replace a device by itself in the same environment because, even after reformatting, it will appear as already paired (MAC address recognized).
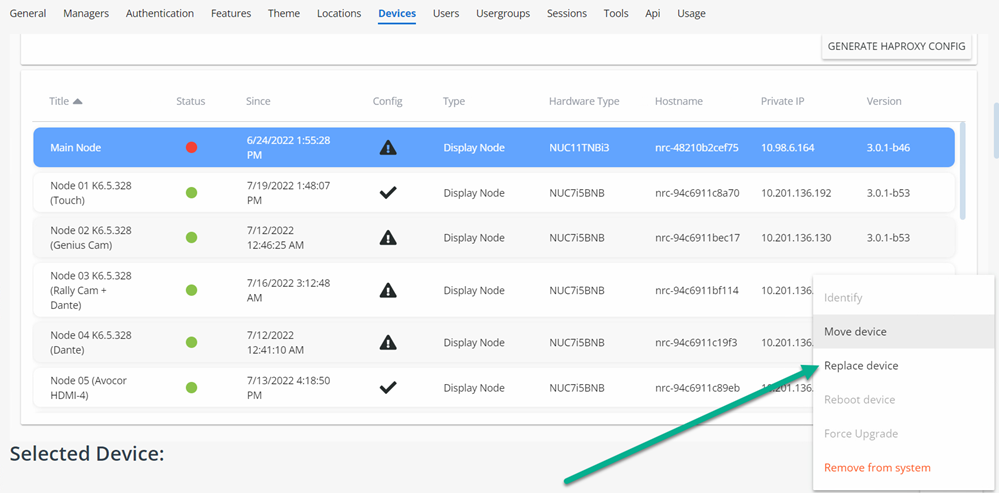
- Go in "Devices" tab.
- Find the offline node you want to get replaced by the new one.
- Click "Actions" menu at the bottom of the devices list.
- Click "Replace Device"
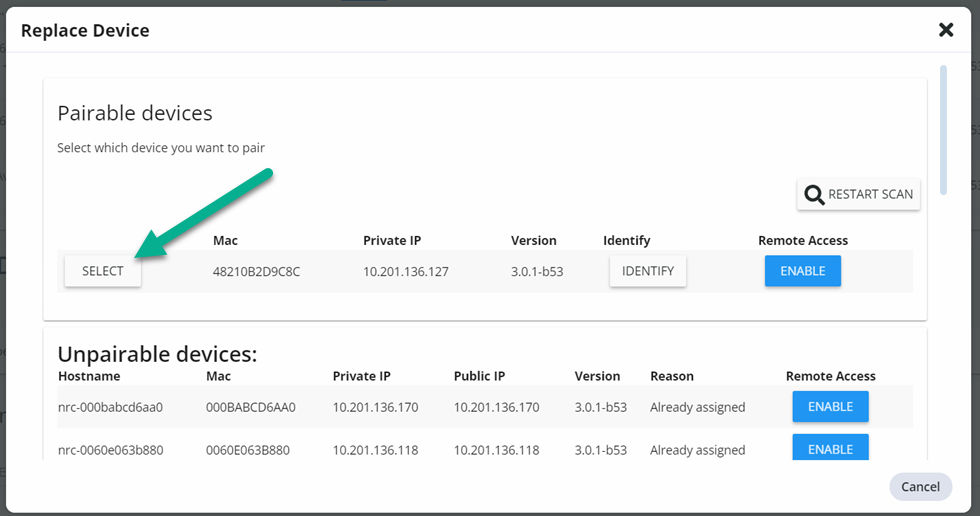
- The device discovery tool pops up. Find your new device and click "Select".
You may need to verify the device locked configuration regarding its peripheral.
Warning: If you replaced a device that was declared in the cloud, and that device ever comes up online again. It won't be able to connect to the cloud because it will try to connect with an outdated identity (cloud will refuse connection). In that case, you should reformat/reflash this node, such as it can be paired again.