Most peripherals are directly connected via USB to the ClickShare Base Unit. We advise using a certified device or at minimum, a compatible device listed here for the best performance.
Here are the standard steps to set up the ClickShare Conference (CX) device:
- Power on the CX device and wait until you see the ClickShare wallpaper on the meeting room screen.
- Connect the peripheral to the CX device using the OEM or high-quality USB cable.
- Power on the peripheral and wait until both camera and microphone icons appear on the ClickShare wallpaper bottom bar in grey (this means the peripheral is configured).
- Pair the Button with the ClickShare Conference device (how to: see KB 5924).
- Plug the Button into the PC and wait until the speakerphone is available in the windows taskbar audio device, at this point it will also become green in the ClickShare bottom bar on the wallpaper.
- Start the UC&C tool and check functionality (how to: see KB 2378).
Here are some steps which can be followed to troubleshoot USB connection problems:
- Upgrade the ClickShare Base Unit (how to: see KB 5923) and peripheral (how to: see respective user manual), reboot the ClickShare Base Unit for good measure and finally do some testing by sharing and using the peripheral in a test call. More detailed steps can be found in KB 2355 (for Windows) and KB 9635 (for macOS). If you find any problems, proceed to the next steps listed in this KB.
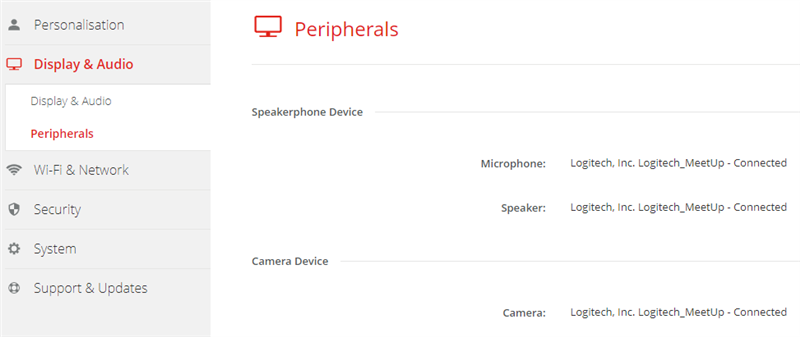
- Check if the device is detected by the ClickShare Base Unit, this can be done via the ClickShare Configurator (Display & Audio > Peripherals) of the Bae Unit or via the icons shown in the status bar of the ClickShare wallpaper.
The device will not work if it's not listed.
- Check if the peripheral is fully functional when connecting it directly to a laptop. The best way to do this is to change nothing about the setup except replacing the ClickShare Base Unit with a laptop.
- Make and test the simplest possible setup necessary for conferencing including the peripheral, the ClickShare Base Unit, a display and a laptop for sharing and testing again. Please take into account the USB connection advice below as well.
Here are some guidelines which can be used to minimize potential sources of issues when it comes to USB connections:
- Use the native USB cable that comes with the peripheral.
- Avoid the use of "in between" devices such as HUBs or converters. Badly functioning hubs or adapters may cause damage to the ClickShare Base Unit.
- In case a 3rd party HUB or converter is being used to connect a peripheral to a CX unit it is advised to use one that is compliant with USB 2.0 specifications.
- Avoid the use of "cheap" third-party cables. Badly functioning cables may cause damage to the ClickShare Base Unit.
- Avoid the usage of very long USB cables, the longer the cable the less reliable power and signal delivery will be. In particular USB 2.0 is graded to have a maximum cable length of 5 meters. This advice is applicable to any cable connection to and from the ClickShare Base Unit.
- Check the peripheral specs for power requirements and/or USB standard used. Not all USB cables are compatible with every standard either:
- ClickShare Conference is USB 2.0 backwards compatible, a device that is only USB 3.0 compatible likely won't work. USB 1.0 devices should work.
- The power supplied by the base unit USB ports is:
- 500 mA for the USB-A ports
- 900 mA for the USB-C ports
- Tip: if the device doesn't work on the USB A port, try it on the USB-C port and vice versa.
- If the device requires more power and doesn't have a separate power supply, try using a powered USB hub.
- Only connect a single USB device of each type to the ClickShare Conference Base Unit to avoid conflicting devices. This means:
- No more than 1 speakerphone, including the audio part of an all-in-one camera.
- No more than 1 camera.
- Use a USB switch if this is required for the setup.


