

The configuration of a Virtual Classroom and a Hybrid Classroom is basically the same. All procedures described below are valid for both configurations. The difference is noticeable for participants: while joining a Hybrid classroom session, participants are asked whether they are in the room or remote. Depending on the selection, the student UI is different.
This article includes the following topics:
- Introduction
- Virtual Classroom design
- Audio setup considerations and dimension
- Audio DSP setup for Virtual Classrooms with remote host support
- Component overview
- Component configuration
- Location settings for the Virtual Classroom configuration
- Interactive Streaming configuration
- Gallery configuration
Introduction
The Virtual Classroom has been created to provide an experience which is as close as or better than an in-room lecture experience. In order to create that experience a number of essential elements are listed here:
- A physical space which is sound proof where the teacher has sufficient distance from the displays and the ability to walk up to the displays.
- Video lighting to capture the room and teacher perfectly.
- Audio system to hear the teacher content and the remote students and hosts talking. Stereo sound allows to create a directional effect to make sure the teacher can react to students talking from the left side, middle or right side of the display wall.
- A microphone system, preferably with close mic options for all presenters in the room. Typically there will be 2-4 microphone channels needed to cover all possible virtual classroom use cases.
- A display wall with displays which allow students to be shown within 22-25 inch view spaces. For a typical setup with 4 students per display tile, this comes down to 46-50 inch displays.
- A touchscreen to be used as a digital whiteboard. We suggest a 65 inch touchscreen so that users can see the teacher writing.
- Optional touchscreen for an additional teacher user interface. The teacher can control the lecture from a BYOD (Bring Your Own Device) but as this is usually the main device to present from, we suggest to provide an alternative control display.
- A webcam per tile to allow students connected to that tile to see eye to eye with the teacher when talking to each other.
- One or more teacher cameras to capture the teacher from different viewpoint
Virtual Classroom design
This is a reference design for a 24 seat capacity room. The capacity can be increased of reduced by adjusting the numbers of tile displays, tile nodes and associated webcams.
There is a theoretical maximum of around 350 attendees to a virtual classroom session. For bigger setups we suggest to increase the amount of room cameras and associated camera nodes.

| AV BOM | Other |
|---|---|
| 1. HD displays with HDMI™ input (participants) | 12. Campus network |
| 2. HD displays with HDMI input (whiteboard) | 13. Campus BYOD WiFi |
| 3. HD displays with HDMI input (shared content) | 14. Teacher's laptop (BYOD) |
| 4. HD displays with HDMI input (user interface) | 15. Teacher |
| 5. USB camera per tile | |
| 6. Sound bar per display wall column | |
| 7. Wireless or wired teacher microphone | |
| 8. Audio DSP with AEC, supporting Dante | |
| 9. Room USB 3.0 camera | |
| 10. Teacher USB 3.0 camera | |
| 11. Dante USB interface (tile nodes, main node, camera manager node) |
More Far-view/Confidence nodes can be added:
- Participant view
- Session overview
- Silent Questions
- Polling
- Copy of content on another display.
For basic Virtual/hybrid classrooms you can rely on the digital audio mixing feature of weConnect and a AEC microphone (e.g. video conference unit, or speakerphone) instead of using a DSP to manage all audio streams and mixes. This largely simplifies the wire diagram and the room setup.
Audio setup considerations and dimension
Consider the following situation:
- n display wall tile nodes showing remote participants
- participant displays in a 3x2 video wall
- stereo speaker system (left + right channel) or one sound bar (mono) per display wall column (c)
- m teacher microphones
|
Inputs on DSP | Processing in DSP | Outputs on DSP |
|---|---|---|
| n tiles (mix from tile) | m AEC channels (one per mic) | n tile mixes |
| m teacher microphones | n tile mixes (mix minus for each tile) | two speakers (stereo left - right), OR |
| one content audio (mix from main node) | 2 mixes (left + right), or | c speakers (mono) |
| c mixes (participants per wall column) | one clean teacher signal | |
| one clean room mix | ||
| Example: | Example: | |
| 6 tiles + 2 teacher mics + 1 shared content = 9 inputs | 6 tiles + 3 columns + 1 clean teacher = 10 outputs (sound bars) | |
| 6 tiles + stereo speaker + 1 clean teacher = 9 outputs (stereo speaker) |

With a stereo system reduce the speaker mix output to two and use panning options to position the tile audio from left to middle to right so that the audio seems to come from the tile where the student speaks, which feels natural to the teacher.
Audio DSP setup for Virtual Classrooms with remote host support
This section only applies if Digital Audio Mixing is disabled for the concerning location.
The audio and video of remote hosts is streamed directly to all other remote participants, be it hosts or students, and to the Remote host tile node. A remote host gets the audio mix of the remote students via his/her tile node.
The audio and video of remote students is streamed to the tile node on which he/she is visible. A remote student gets the audio mix of all other remote students from his/her tile node.
So the DSP must be configured to manage the following:
- a remote student tile gets the sum of the audio of all remote student tiles minus the audio of its own from the DSP (i.e. a mix-minus of the audio of all remote student tiles)
- the remote host tile gets the sum of the audio of all remote student tiles.

Component overview
The nodes described below are exclusive to the Virtual classroom and Hybrid classroom use cases.
Display Wall Tile Node
Each display wall tile node drives one screen in a display wall and can be configured to have a custom number of seats for remote hosts or remote hosts in a grid pattern:
- from one to six remote participant seats in case of NCN-100
- up to 12 remote participant seats in case of NCN-210/NCN-220.
If a USB camera is connected to the display wall tile node, its camera stream is sent to the remote participants on the tile node.
The display wall tile node creates an audio mix from the audio of all its participants and puts it available as an audio output (Main mix). In case digital audio mixing is enabled, the mix of the remote students' audio on a tile is automatically sent to every other remote student tile node.
Next to that a student tile node creates a mix minus for each of its remote students, adds the audio coming in from its USB port (AUX IN) to it and sends it to the respective remote student. If digital audio mixing is enabled, the audio received from the other student tile nodes is automatically added to the mix minus before sending it out.

Camera Manager Node
The camera manager node provides an extra camera source to all students by encoding a USB camera. This camera typically is a good quality PTZ (Pan Tilt Zoom) camera which can be controlled by an operator to allow for a more production oriented experience.
The camera manager node receives the echo-canceled microphone signal, adds it to the camera stream and sends it to all remote participants.
In case digital audio mixing is enabled it receives the audio of all remote participants and the audio of the shared content and mixes it to get the AEC ref signal. This AEC ref signal is available at the audio output (Main mix).
Component configuration
The minimal required configuration for a functional virtual classroom setup consists of at least one display wall tile node and one main node. The minimal recommended configuration includes one or more display wall tile nodes, one main node and one camera manager node.
This setup can be enhanced with far-view/confidence nodes to be used with confidence monitors or a digital whiteboard.

Location settings for the Virtual classroom room configuration
Create a Virtual Classroom or Hybrid Classroom
- Browse to the admin UI
- Select tab Locations
- Select the correct room
- Under Location settings, set Digital Audio Mixing according to how the audio is to be managed
- Optionally enable Direct screen sharing to remote participants
- Select tab Room configurations
- Click Add configuration
- Select Virtual Classroom or Hybrid Classroom
- Enter a unique Configuration name.
Configure a Display wall tile node
- On the red bar of one of the nodes, click Change role
- From the list, select Display wall tile node
- If needed, click the red bar to open the configuration page of that node
- Configure the Displays:
- Select role Remote participant display
- Optionally enter a Title
- Enter the x and y parameter, defining the position of the tile node display in the display wall. Position 0,0 is the left top display in the wall.
This parameter is used by the software to fill the seats on the wall from the center towards the outline - Set the Viewport columns and Viewport rows to define the number of participants on the display.
E.g. to host six participants on a display, set viewport columns to three and viewport rows to two - Select who is hosted on the display (Used to show): Remote participants or Remote hosts
- Configure Audio inputs
- If digital audio mixing is enabled, you can leave all audio equipment set to Not used
- If digital audio mixing is disabled, specify the incoming audio as Aux in. Most likely the audio input device will be a Dante USB audio I/O converter or similar. The audio input must be a mix of the audio output of all other display wall tile nodes
- Configure Audio outputs
- If digital audio mixing is enabled, you can leave all audio equipment set to Not used
- If digital audio mixing is disabled, specify the outgoing audio as Main mix. Most likely the audio output device will be a Dante USB audio I/O converter or similar. The audio output is a mix of the audio of all participants on this node
- Configure USB cameras if a USB camera (or webcam) is connected to this node
- Select role Teacher camera
- Choose a Title, e.g. Seat cam tile x
- Leave Audio set to No audio
- Optionally set checkbox Favor detail above fps
This stream is only visible to the participants on this node.
- Optionally set a Wallpaper
- Click Save.
Configure the Camera manager node
- On the red bar of one of the remaining nodes, click Change role
- From the list, select Camera manager node. This is the main camera manager node, having the main teacher camera connected. Its stream out is added to the recording in case recording is enabled.
- If needed, click the red bar to open the configuration page of that node
- Optionally, configure the Displays:
- Select role Camera manager display
- Optionally enter a Title
- Now configure USB cameras (skip audio in and out at this stage)
- Select role Teacher camera
- Choose a Title, e.g. Main teacher camera
- Set Audio to the audio device that brings in the clean teacher voice
- if digital audio mixing is enabled this will probably be an AEC mic, a speakerphone or a video conference unit
- if digital audio mixing is disabled this will probable be a Dante converter (connected to the DPS)
- Optionally set checkbox Favor detail above fps
- Configure Audio inputs
- The role of the audio input that brings in the clean teacher voice is automatically assigned a role: Used by [USB camera title]
- Optionally enter a Title
- Configure Audio outputs
- If digital audio mixing is enabled, specify the outgoing audio as Main mix for the room speakers
- Optionally enter a Title
- If digital audio mixing is disabled, leave the role to Not used
- Optionally set a Wallpaper
- Click Save.
Configure the Main node
- On the red bar of one of the remaining nodes, click Change role
- From the list, select Main node. This is the node to which shared content is sent. It creates a combined layout of the shared sources (in case there is more than one) and combines it with the mix of the audio streams of those sources. Its stream out is added to the recording in case recording is enabled.
- If needed, click the red bar to open the configuration page of that node
- Configure the Displays:
- Select role Main display
- Optionally enter a Title
- Configure Audio inputs
- A main node typically has no audio input devices connected: no configuration to be done
- Configure Audio outputs
- If digital audio mixing is enabled, you don't have to specify any audio output device
- If digital audio mixing is disabled, assign role Main mix for the Dante converter that transfers the audio mix to the DSP
- Optionally enter a Title
- Configure USB cameras
- Select role Teacher content for device Teacher content (Barco:001)
- Choose a Title, e.g. Shared content
- Set Audio to Default
- Optionally set checkbox Favor detail above fps
- Optionally set a Wallpaper
- Click Save.
Interactive Streaming configuration
Additionally, you can configure Interactive Streaming for your Virtual or Hybrid Classroom. It will enable you to expand the reach of your sessions and draw a larger audience by allowing additional users to follow the streaming of a live session.
These users will not have a virtual seat on the participants’ wall, but they can see the content shared by the host: camera, shared screen, and whiteboard. They also have access to a limited set of interactivity features, consisting of polls and chat.
For more information about Interactive Streaming please follow this link https://www.barco.com/en/support/knowledge-base/6028-discover-the-brand-new-interactive-streaming-feature-in-weconnect
Prerequisites
You will need a dedicated NCN Base node with a full-HD display.
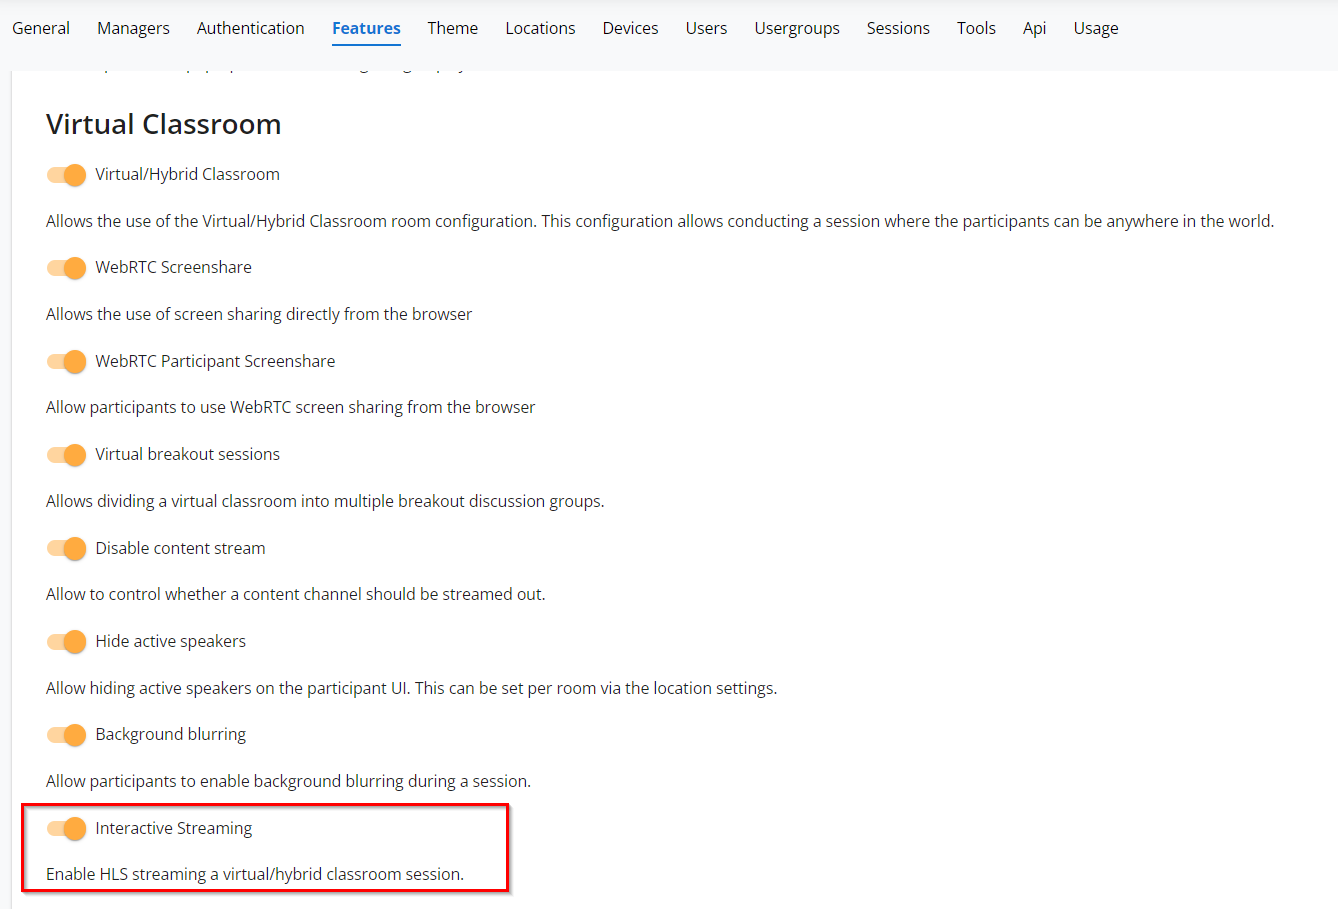
Step 1. Make sure the Interactive Streaming feature toggle is enabled
- Go to the Admin UI
- Select tab Features
- Switch on the Interactive Streaming toggle in the Virtual Classroom section
- Note! If you do not see the Interactive Streaming toggle, please contact your Customer Success Manager at Barco
Step 2. Check if Digital Audio Mixing is enabled
- Go to the Admin UI
- In the tab Locations, select a location where you would like to add Interactive Streaming
- Under Location settings, check if the Digital Audio Mixing toggle is on or off

Step 3. Add Interactive Streaming to your room configuration
- Go to the Admin UI
- In the tab Locations, select a location where you would like to add Interactive Streaming
- Under Room Configurations, select a room configuration where you would like to add Interactive Streaming (only available for Virtual and Hybrid Classroom types)
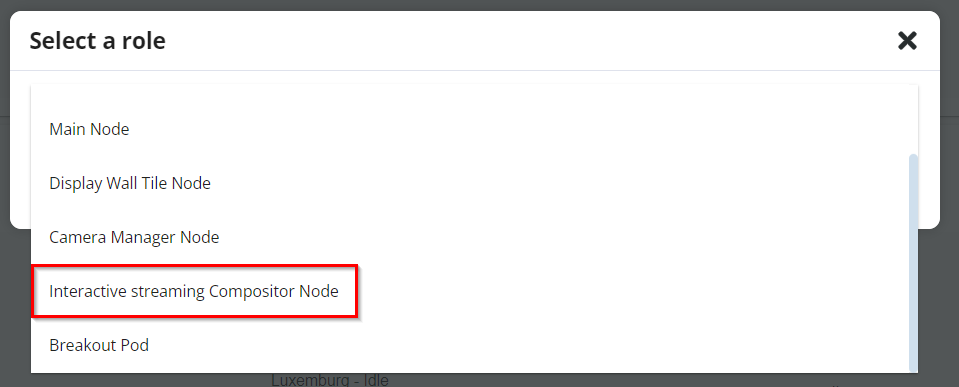
- Select a device which you would like to set as Interactive Streaming Compositor Node
- Change role of the device to Interactive streaming Compositor Node
- Configure the Displays:
- Select role Interactive streaming Compositor Display
- Make sure that the resolution is preferably 1920x1080
- Note! If you attach a display with a lower resolution than full-HD, the stream that is sent to viewers will have a lower resolution as well. It might be difficult to see details or read text. A higher than full-HD display resolution will unnecessarily load the node as the stream resolution will never exceed 1920x1080
- Optionally enter a Title

- Configure the Audio inputs:
- If digital audio mixing is enabled, you can leave all audio equipment set to Not Used
- If digital audio mixing is disabled, specify the incoming audio as Aux in. Most likely the audio input device will be a Dante USB audio I/O converter or similar. The audio input must be a mix of the audio outputs of all other display wall tile nodes showing participants (display wall tiles configured to show remote hosts must not be included)
- Configure Audio outputs:
- In all cases, you can leave all audio equipment set to Not Used
- Configure USB cameras if a USB camera (or webcam) is connected to this node
- In all cases, you can leave all USB camera’s set to Not Used
- Wallpaper
- A node configured as Interactive streaming Compositor node will never show a wallpaper, so this setting can be left to the default setting.
- Click Save.
Now you are all set! Next time when you create a session, choose the right room configuration and you will see an option to enable Interactive Streaming.
Gallery configuration
Additionally, you can configure a Gallery for your Virtual or Hybrid Classroom. Once configured, a Gallery will be available as a separate channel for remote participants.
Prerequisites
You will need a dedicated NCN Base node with a full-HD display or full-HD HDMI dongle.
Step 1. Make sure the Gallery feature toggle is enabled
- Go to the Admin UI
- Select the tab Features
- Switch on the Gallery toggle in the Virtual Classroom section
- Note! If you do not see the Gallery toggle, please contact your Customer Success Manager at Barco

Step 2. Add Gallery to your room configuration
- Go to the Admin UI
- In the tab Locations, select a location where you would like to add a Gallery
- Under the Room Configurations, select a room configuration where you would like to add a Gallery (only available for Virtual and Hybrid Classroom types)
- Select a device that you would like to set as the Gallery Compositor Node
- Change the role of the device to the Gallery Compositor Node

-
Configure the Displays:
- Select a role Gallery Display
- Make sure that the resolution is 1920x1080. In order to control the resolution, switch to the Devices tab for the selected location, select the node and in the Display section select a 1920x1080 resolution
- Optionally enter a Title

-
Configure USB cameras if a USB camera (or webcam) is connected to this node
-
In all cases, you can leave all USB camera’s set to Not Used
-
-
Wallpaper
-
A node configured as a Gallery Compositor node will never show a wallpaper, so this setting can be left to the default setting
-
-
Click Save.
Now you are all set! Next time when you create a session, choose the right room configuration and a Gallery of the remote participants will be displayed on the Gallery display and as a channel for remote participants.

