Introduction
There are a number of user types in the system: admins, partners, managers, producers (or operators), support people, teachers (or hosts) and students (or participants).
The Producer's key role is to support a teacher during a live session.
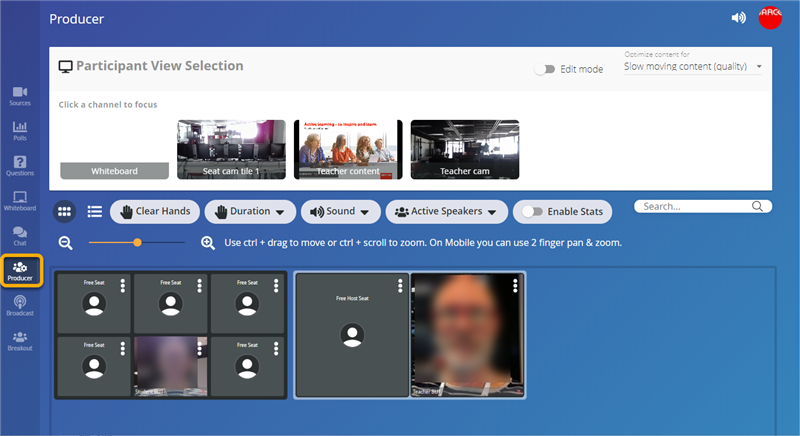
While logging in as a Producer you are directed to and have full access to the Teacher UI of the lecture. weConnect offers some dedicate features that enable the Producer to support a teacher in the best possible way. These features are available from the Producer view icon in the left bar of the Teacher UI.


The sections below guide you through the features that can be accessed from the Producer view.
Participant view selection
From this section the teacher/producer can manage the streams that go out to the remote participants and remote hosts.
- Click a channel to focus
Clicking one of the stream thumbnails in this section while the Edit toggle is disabled, forces its content to appear in the primary view on the participant's UI. This can be used to put the focus of all participants on a particular stream.
Note: a participant can override and choose a different stream to appear in his/her primary view at any time.
- Enable/disable a channel
If the Edit toggle is enabled, you can click button Disable in a stream thumbnail. At this point the stream is no longer sent and as such no longer available as a channel in the participant's UI. In the thumbnail of a disabled stream, you can click Enable to start streaming this source again.
- Optimize content
Clicking this entry opens a drop down box. Slow moving content (quality) is used for still content or slow moving content only. The image quality has priority over frame rate. Fast moving content (frame rate) is the best option for fast moving content or video for which frame rate is more important than resolution of the image.
Managing participants
In this section you can find an overview of all features that are available in the Producer UI of weConnect to manage the participants.
- Tile view versus list view
- Raised hands
- Muting participants
- Banning a participant
- Moving participants on the display wall
- Getting more participant information
- Showing statistics per participant
- Managing active speakers
Tile view versus list view
![]()
In tile view the remote participants and remote hosts appear on a representation of the physical display wall tile nodes in the teacher's room.
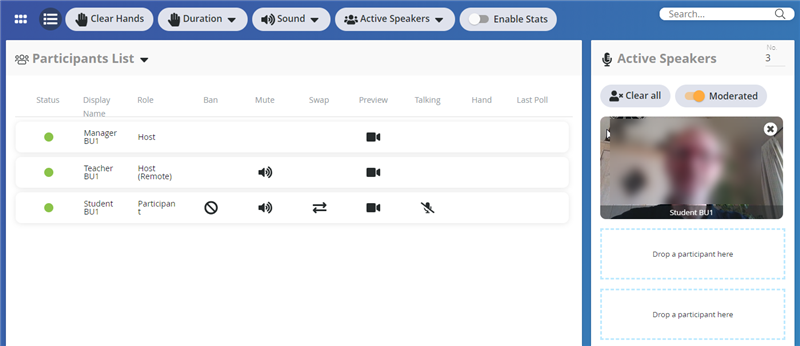
In list view the remote participants and remote hosts appear in a list. To the right of this list you can see the Active Speakers user interface (see below).
Raised hands
If a participant raises his/her electronic hand the following events happen in the teacher room:
- a hand icon pops up on his/her thumbnail on the display wall and remains visible for five seconds

- a green bar including a small hand icon highlights the participant's name for 30 seconds (default setting)

The teacher/producer has two options:
![]()
- Clear hands: clicking this button clears all raised hands and green bars from the display wall and from the Producer's UI
- Duration: the teacher/producer can change the hand raise duration from 30 seconds to another value

Muting participants
The teacher/producer can mute participants at two different levels:
- front end mute: all participants can be muted at once, including new participants that log in to the session. At this stage participants can unmute themselves. They cannot be unmuted by the teacher/producer because of privacy regulations.
To perform these actions, click Sound and choose your setting.

In the list view a teacher/producer can click the microphone icon of muted participants: this pops up a warning at the participant's end asking the him/her to unmute. - back end mute: at the other hand a teacher/producer can mute individual participants leaving them with no option to unmute. The participant gets a notification that he/she is muted by the host. Only the teacher/producer can unmute him/her.
To perform this action in tile view, click the three dots on the avatar of the participant and select Mute in the drop down list. Or click the Mute icon next to the participant's name in the list view.
Banning a participant
If for whatever reason one of the participants needs to be removed from the lecture, with no means for him/her to log in to the same lecture again, the teacher/producer can do so in tile view by clicking the three dots on the avatar of the participant and selecting Ban in the drop down list, or by clicking the Ban icon next to the participant's name in the list view.![]()
Moving participants on the display wall
By default the first participant joining gets the central position on the display wall. As more participants log in and join a lecture, their thumbnails are added to the display wall spirally: from the center and moving out to the edges.
A teacher/producer can choose to move participants to different positions on the display wall from personal preference, or to define the groups in break-out sessions. See KB11756.
There are a couple of ways how a teacher/producer can manage the position of a participant on the display wall:
- In tile view drag and drop the thumbnail of a participant to any free seat on the display wall: the participant moves to the new position on the display wall
- In tile view drag and drop the thumbnail of a participant to another seat that is already taken: both participants swap positions on the display wall
- In tile view click the three dots on the thumbnail of the participant and select Swap in the drop down list. Then select the name of the second participant (start typing it until it appears, then click it) and confirm. Or you can do the same from list view by clicking the Swap icon next to the participant's name.


- Click the three dots on a free seat, select Fill seat... and fill in the name of a participant who is in the lecture, but not showing on the display wall:

- Click the three dots on a seat of a participant that has left the lecture (disconnected)and select Free seat to release the seat for another participant:

Getting more participant information
You can consult the profile of a participant (avatar, full name, session tag) from the tile view by clicking the three dots on the thumbnail and selecting Show Profile.![]()
In list view you can select the Camera icon to see the stream from the participant's webcam.
Showing statistics per participant
During a live session the teacher/producer can show information about the participation of each attendee on their individual thumbnails. This information includes thing like amount of hand raises, amount of questions answered, the answer to the last question, how many correct answers given, etc.
This can be done buy setting toggle Enable stats to enabled.
![]()
Managing active speakers
By default the thumbnails of the last three speaking remote participants appear at the bottom of the other participants' user interface. This can be managed from the producer UI.
The amount of active speakers that is shown can be changed (1, 2, or 3)
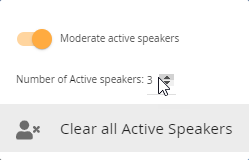
- click Active speakers and change the number or the active speakers in the drop-down menu. The setting Moderate active speakers does not have impact.


- or you can change the number of active speakers from the right section of the tile view

As a host/producer you can moderate the active speakers
Form the Producer UI or from within the list view, enable toggle Moderated.
The you can drag/drop remote participants from the Participants list section onto the Open positions on the Active speakers section.
This action forces the selected participant's thumbnail to remain present at the bottom of the other participants' user interface, whether this participant is speaking or not.
Use button Clear all or Clear all active speakers to remove the assigned participants from the Active speakers positions. From that moment onwards, the last speaking participants will be shown as Active speakers again.


