Audio setup
Basic principles
weConnect is a flexible system that allows to reuse the equipment in a classroom for different lecture types (i.e. room roles or room configurations). For example, a connected classroom might be used as a interactive classroom in one lecture, while in the next lecture the same equipment is used in an overflow type lecture.
The basic principle in weConnect is that the audio (hardware) setup and wiring is common between the different supported lecture types and there is no rewiring or re-adjustment needed when switching from one lecture type to another.
In order to achieve this, two basic principles apply:
- for each room role configuration, a specific role is assigned to each audio input of all devices in the selected room location
- each device is calibrated individually, meaning that the audio levels of the inputs and outputs of a device are calibrated independently of other devices.
Basic audio setup
In the most basic case the audio setup consists of the audio system being connected directly to the Main node or to the Camera manager node in the room. The picture below shows the two possibilities for a basic audio setup.
- audio via HDMI™/DisplayPort™ to a screen that has built in speakers
- audio via USB (e.g. USB audio bar, USB to analog convertor, USB to Dante…)

We recommend using USB based audio (e.g. using a USB to analog converter) especially in more complex setups that also make use of a microphone.
Advanced audio setup with AEC (Acoustic Echo Cancellation device)
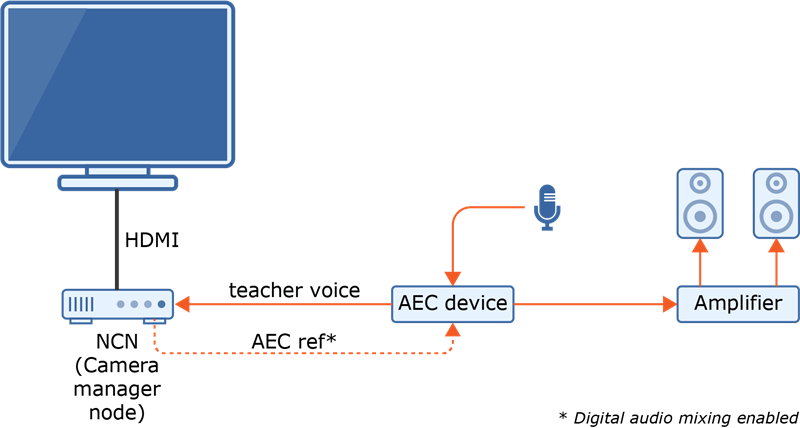
Room configurations that are used in multi-location type lectures with audio streaming (e.g. Main overflow room, Overflow room, Virtual classroom, Hybrid classroom) require the use of an AEC device (=Acoustic Echo Cancellation) as part of the setup in order to filter out the audio coming from the room speakers picked up by the teachers microphone. In this way a “clean” teacher voice can be presented to the node that streams out this audio to the remote location(s) and/or to the remote participants/hosts. The picture below shows what such a setup looks like.

The NCN (or node) in the picture above is the node to which the main teacher camera is connected. Typically this is the Camera manager node or in very specific cases it can be the Main node.
Please note that for optimal echo cancellation the speakers must be connected to the audio output of the AEC device, not to the audio output of the node itself. Devices like speakerphones and video conference systems have AEC built-in.
The AEC device requires an AEC reference signal, which is the audio mix that needs to be subtracted from the incoming teacher microphone signal in order to obtain the clean teacher voice.
In a Virtual/Hybrid classroom this AEC reference signal is the audio mix of remote participants, remote hosts and shared content; exactly what must be audible in the room.
In a Main overflow room the AEC reference signal is the audio mix of the remote locations and shared content.
If Digital audio mixing (a setting in the Locations menu of the admin UI) is enabled, the AEC reference signal is available as an audio output on the Camera manager node. If Digital audio mixing is disabled, it must be created in a DSP (Digital Signal Processor).
In the room configuration (under Locations in the admin UI), the audio input carrying the clean teacher voice must be assigned as the Audio linked to the main teacher camera in the section USB cameras of the Camera manager node.
Conclusion
The basic audio setup as presented above is only usable for lecture types that do not use any microphone audio streaming between multiple locations, e.g. huddle space, interactive huddle space, classroom, collaboration room. However, for all lecture types that include streaming of the teachers voice, the advanced setup is to be used.
Using the advanced setup still allows configuring basic room roles and starting the corresponding lectures for that room location, because the input role of the inputs that are not required for the basic use case can simply be set to “Not used” for that room role.
Audio Calibration
The weConnect system allows calibrating audio volumes at different levels and offers a dedicated Audio Calibration dialog allowing to remotely (even offsite!) calibrate input gains and monitor the audio present on different inputs of a selected device.
Default main volume
This is a setting on room location level (not on device level). It is the default value to which the main volume (controlled by the volume slider in the teacher UI) is set at the start of each new lecture.

The Default main volume is applied to the audio coming out of the speakers in the teacher room: a mix of shared content audio, all remote participants and all remote hosts. At the start of each new lecture, the Default main volume is reset to the default value.
Default output volume
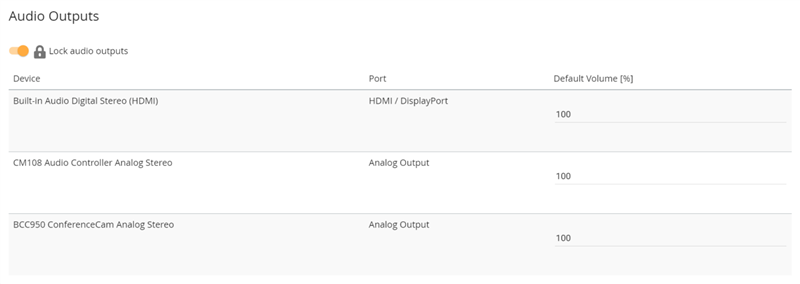
Selecting a device in the Devices page of the admin UI shows the configuration page of this device including its hardware inputs and outputs. As shown in the picture below, for each of the hardware outputs of a device a default volume value can be set. As certain speaker devices (e.g. some USB audio bars) do not have any volume adjustment, the default volume value in the list below allows setting the base volume for such device. Whenever a lecture is active, the volume slider in the teacher UI allows to change the volume (note that changing this volume slider will affect all the audio outputs used by all the nodes in the room), i.e. the volume set in the teacher UI is applied as a scaling factor on top of the Default output volume value of each hardware output.

Default input volume
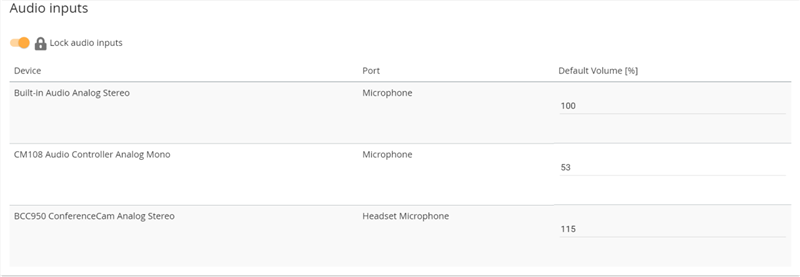
In a similar way as the audio hardware outputs, the Devices configuration page allows to set the default volume of the audio hardware inputs of the selected device. At the start of a lecture, these gain values are applied for the inputs that are used in the selected lecture type. In some room configurations the input role of a certain input can be set to “Not used”, in such case the input will be muted at the start of a lecture).

Calibrate audio
The basic philosophy applied in weConnect is that each device is calibrated individually, independent of any other device. Two types of items can be calibrated:
- the default volume of screen sharing
- the default volume (gain) of each of the hardware inputs of a device
Judging whether or not a volume is set correctly is not easy, because there are many intermediate places that can have impact on the volume that eventually comes out of the speakers. To make it easy to adjust, a dedicated dialog is available as part of the weConnect admin UI. It can be launched by pressing Calibrate audio below the Audio profiles section on the device configuration page.
![]()
This dialog allows to remotely adjust the default volumes as the audio (and video) of the selected device is streamed towards the machine (e.g. laptop) on which the Calibrate audio dialog runs. This makes it possible to remotely assist a room during installation without having to go onsite. Of course in case of microphones we still need someone to speak into the microphone when adjusting its volume (gain).
A Reference sample can be played: it is the idea to adjust the gain of the input to be calibrated so that the it sounds as loud as the reference sample.
The Calibrate audio dialog can be launched in two cases:
- When no lecture is active.
This allows calibrating the default volume of all the inputs used over all the room roles that have been configured. If the room configuration to be activated when no lecture is active is set to Huddle space (see Room configurations in the admin UI) then the default content sharing volume can also be calibrated. In case the room configuration to be activated when no lecture is active is set to “Idle”, only the hardware inputs used in the configured room roles can be calibrated, not the content sharing volume as content sharing is not possible when in Idle mode. - When a lecture is active.
This allows calibrating the default volumes of all the hardware inputs used in the active room role (=type of lecture that has been started) and the content sharing volume.
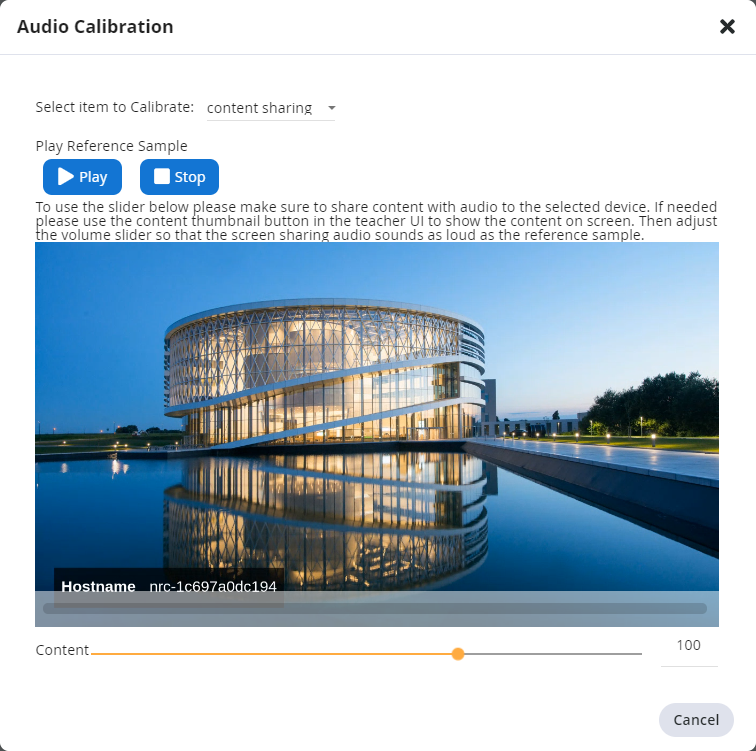
The screenshot below shows the Calibrate audio dialog. From the dropdown box in the dialog you can choose to calibrate the content sharing volume or the microphone (=hardware inputs) volumes.

In order to calibrate the content sharing volume it is necessary that content sharing is active and on screen. Use MirrorOp or the share button in the teacher or student user interface and share content with audio. Make sure the content is shown on screen (can be checked in the viewer of the Calibrate audio dialog). It can be required to use the teacher UI to launch the source on screen. The audio can now be heard on the computer that runs the calibration dialog (make sure the speakers of this computer are not muted), even if this computer is in a different location. In order to calibrate the volume, press Play to start the reference sample and adjust the content slider until the volume of the screen sharing is similar to the volume of the reference sample.
In order to calibrate the volume of microphones and any audio connected to one of the hardware inputs of the selected device, change the selection in the dropdown box to microphone. Now you will see as many sliders as there are audio inputs in use for the active lecture type or over all configured lecture types in case no lecture is active.
In order to calibrate an input, first stop the content sharing, if still connected. Then put all the sliders to zero and while playing the reference sample, open up one of the sliders until the audio sounds as loud as the reference sample. Again the audio can be heard on the computer that runs the calibration dialog. After all input gains have been calibrated, the dialog can be closed. You can notice that the default volumes as set in the calibration dialog have been saved and are visible in the audio inputs section of the configuration page from where the calibration dialog was launched.


