This article consist of four main chapters
- General: introduction to the room configuration concept and terminology
- Rooms and devices: types and roles
- Managing room configurations
- Configuring a standard room
General
In order to understand how rooms are configured it is necessary to understand the underlying philosophy of weConnect. The purpose of the system is to set up a room once. When using the room various behaviors might be needed based on the lecture needs. A room may be used as a traditional classroom, as an active learning space or overflow room. When connecting rooms for remote learning or as overflow room other settings are required to make the room provide the technology support to teacher and students which match the needs at that time. In order to make these settings and changes transparent for the teacher and students, the room will need to be set up with a number of configurations, where each configuration defines one of the possible behaviors.
Using this approach allows multiple use cases out of a single physical classroom space without the need to reconfigure after the initial setup. Within a single day a room can be used as an ad hoc huddle space for students, for traditional lectures, as overflow room for an auditorium and as a remote learning location for a lecture with the teacher teaching from a remote campus without the need for any support intervention.
The components to be set up are the room itself for the general behavior (i.e. room type), the individual display nodes which may perform different functions depending on the general room behavior, and the display outputs of said display nodes which can show different content based on the room setting and display node setup.
Behaviors are expressed as room types in weConnect and every physical room can have multiple room types configured. The general structure is as follows.
There is one possible default role for when a lecture is created. There is also one possible role for when there is no lecture running.
At the start of a lecture, or when planning a lecture, the default room type is filled in, and a specific alternative type can be chosen.
Each room type controls what the display nodes need to do. For any chosen display node role another role can be chosen for the display node output(s).
3rd party devices in each room role can also be assigned roles, this is the way to instruct the system what the intended behavior is in, for instance, connecting classrooms. An IP camera designated with the room camera role will be treated differently to a camera designated teacher camera.
When connecting classrooms the system should show the teacher in the remote classroom and the room camera from the remote classroom should be put on a confidence monitor in the teacher’s classroom. So the users always get the same experience, no matter if different rooms are connected from lecture to lecture.
The room configuration for the different locations in an institute has to be performed by a user which has managing rights in the institute. The configuration happens in the admin UI under the Locations tab, in the Room Configurations subsection:
Before explaining how the room configurations are configured, an extensive explanation about the different room roles is required. In this article only the configuration of the classroom and master overflow room (also used for remote learning setups) is explained. A separate article covers the Virtual and Hybrid classroom. The configuration of the other room types is similar. The only exception is the collaboration room where student tables get display nodes configured as Collaboration group node rather than auxiliary display nodes (indicated in the UI as Far-view/Confidence node).
Rooms and devices: types and roles
Room types
weConnect gives the possibility to system administrators to create a range of room types, depending on the purpose of the lecture and the way of sharing content by teacher, students or both.
Each institute room that has a set of weConnect devices, displays, audio and video equipment, etc. can be assigned multiple room type configurations in weConnect. While planning a session, you can choose which configuration you want to use for that particular session. This makes weConnect an extremely flexible education platform.
Room types and functionalities can be grouped into 2 major pillars depending on active or passive use of the room. Moreover, the active group has two subgroups depending on onsite teaching or remote teaching.
Passive use: configurations that do not require a session to be created/started:
- Idle: is the default configuration whenever there is no lecture active. By configuring the devices and screens for this room type, the behavior of the room can be defined for the situation where no lecture is active in this room. Wallpapers can be set or webpages can be shown (inclusive audio if speakers are present)
- Huddle space: allows students to share content on the screen in a non-moderated way. This means that no lecture needs to be started to share content to the screen.
Active use: configurations that require a session to be created/started
- Room configurations for onsite teaching
- Interactive huddle space: allows teachers to run a moderated session in a huddle space. This allows for screen control, interactivity tools and collaboration tools to be used for group work or ad hoc meetings. In case Add-hoc usage is allowed for the location, students can see a button labeled “Use a room now” in the home screen of the weConnect interface which allows them to claim and use a room.
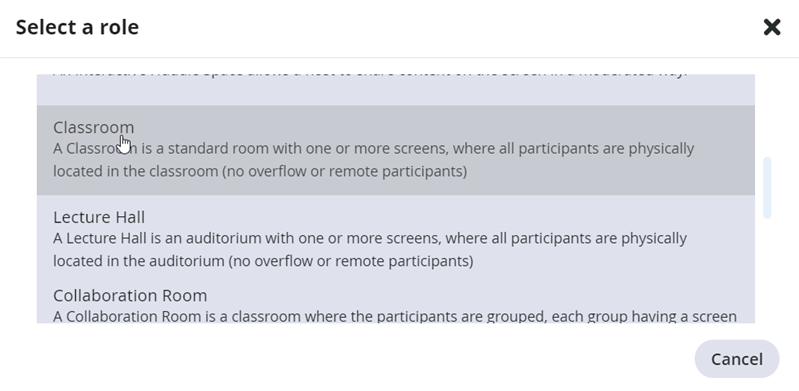
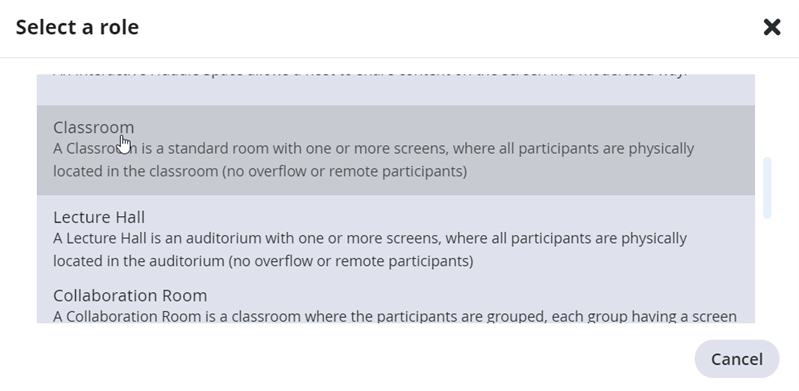
- Classroom: is a standard classroom with one main display and potentially one or more auxiliary screens. Up to 50 students are physically located within the classroom. This is the standard lecture situation where the teacher can share content to a display and allow content from the students to be displayed. With a basic classroom subscription the teacher can log into weConnect and moderate a lecture. Students can log in as well, share content, answer quizzes and polls and download the whiteboard content.
- Lecture hall: is a larger classroom with typically more than 50 students. One or more displays are present in the room. To help the teacher and students additional (auxiliary) displays can be added to the room as confidence monitors or to provide a better view on the classroom content (for big or awkwardly sized rooms). This full featured subscription enables all moderation, interaction and collaboration tools as well as room overflow and remote learning.
- Collaboration room: an active learning space where the students are seated in groups and each group has a screen to share to. These group tables are referred to as pods. The teacher can lock the pod displays or unlock them and share content from any display to any other display in the room. On the main display the teacher can show a layout that consists of the content of multiple pod displays.
- Main collaboration room + collaborative breakout room: a collaborative breakout room consists of a number of collaboration pods in the same room as a main collaboration room, but maybe separated from it by a curtain or a moveable wall. The devices in the breakout room act as extra pods if a main collaboration room session is started (and after opening the curtain or removing the moveable wall). A main collaboration room and collaborative breakout room always run together. If you only want to use the devices of a main collaboration room on some occasions (e.g. for smaller groups), you have to configure them as a Collaboration room as well (next to the configuration of Main collaboration room).
- Room configurations for remote teaching
- Main overflow room: can be used in combination with one, two, or three overflow rooms. The teacher conducts the lecture from the main overflow room. The teacher camera and shared content is streamed out to the remote locations. This room type can be used as an option on classroom and lecture hall room types.
- Overflow room: is a classroom or lecture hall used to host extra students on a different locations in the same lecture. The content streamed out from the main overflow room is shown on the screen(s) of this overflow room. Choose this role for remote learning lectures where the room is on the receiving end of the lecture.
- Virtual classroom: allows conducting a lecture where the students can be anywhere in the world. Using their computer or mobile device, students can fully participate to the lecture. The teacher can see the students on one or more displays.
- Hybrid classroom: a virtual classroom that hosts local students, next to the remote participants.
Device roles
The display nodes or devices used in any of the room types can have different roles. Only relevant roles for a chosen room type are listed:
- Not used: the device is not used for any content distribution and just shows static content, e.g. a wallpaper or HTML content
- Main node: the device is managing the shared content and is driving the Main display(s) in the room
- Collaboration group node: the device is driving the main display in a pod of a collaboration room and can be used by the students on this pod to share content to
- Far-view/confidence node: the device can drive a range of display roles, to replicate content from the display of another node, to provide a user interface on a touch display, to show the session statistics, to show polling results, or to be used as a whiteboard
- Display wall tile node: the selected device is connected to a display (tile) on the display wall of a virtual or hybrid classroom and shows one or more remote participants (students or hosts)
- Camera manager node: the selected device streams connected camera(s) and the selected Aux in audio input to the remote students.
Display roles
An NCN-100 device can have one display connected, an NCN-210 device can have up to four displays connected. For some device roles no display is needed, other device roles require the presence of a display (alternatively an EDID emulator can be used). Displays can be assigned a range of roles:
- Not used: the selected display shows a specified wallpaper
- Main display: can be selected from the teacher user interface to show shared content
- Auxiliary display: can be used as an extra display that can be controlled from the user interface to show additional sources
- Confidence monitor (local): shows the same content as a specified display connected to the same device
- Confidence monitor (remote): shows the same content as a specified display connected to another device in the same lecture
- User interface (touch) display: a touch enabled displays that shows the user interface, allowing to control the session. The tab of the user interface to be shown by default can be specified. Only one touchscreen can be used per device
- Camera manager display: shows the USB cameras streamed out by this device
- Whiteboard: shows the whiteboard. If the display is touch enabled, it can be used by the host to draw on. You can choose to synchronize the content of this whiteboard with the whiteboard in the teacher user interface, or to have this whiteboard run independently
- Polling: shows the polling results
- Session overview: displays the statistics of the lecture
The following displays can only be used in virtual or hybrid classroom scenarios:
- Remote participant display: shows one or more participant seats that are taken as remote participants are connecting. You can have multiple displays in a matrix configuration making up the display wall. To make sure the seats are taken starting from the center of the display wall, the position of each display in the wall must be specified (x and y parameter, where 0, 0 is top left). A remote participant display can host remote students or remote hosts
- Participant view: shows a view of what the remote participants see by default
The following display roles can only be used in (main) overflow rooms, i.e. remote learning scenarios:
- Combined monitor: shows both the content of the main display (shared content) and the teacher camera that are being streamed to the other rooms in the lecture
- Combined self-view monitor: shows both content and teacher camera that are being streamed out to the other rooms in the lecture. A picture-in-picture (PiP) layout is used
- Self-view monitor: shows the room camera that is being streamed out to the other rooms in the lecture
- Content monitor: shows the content that is being streamed out from the main room to the other rooms in the lecture
- Teacher monitor: shows the teacher camera that is being streamed out from the main room to the other rooms in the lecture
- Combined remote auditorium monitor: shows the room cameras of all other rooms in the lecture.
Audio input roles
- Not used: the selected audio input is not used in the system
- Aux in: the selected audio input is used to ingest audio from a microphone or an audio mixing device.
- In the case of a Camera Manager device, you can use this role to indicate which audio input has to be used and streamed out together with the camera video
- In a multi-tile virtual/hybrid classroom setup where the audio mixes are created using an external DSP, Aux in is used on each of the tile nodes to indicate the audio mix coming from the external DSP and consisting of the audio of all other tile nodes
- Loopthrough: sends the incoming audio to an active output. Useful if the AEC device is connected to the camera manager node (to have clean teacher voice combined with teacher camera stream), and another audio input needs to be available, e.g. for recording.
In order to allow weConnect to add the teacher voice to the teacher camera stream in a remote classroom scenario, the AEC'ed (Acoustic Echo Cancellation) teacher microphone signal must be fed into the (teacher) camera manager node and assigned as the audio input for the teacher camera in the USB cameras section.

Audio output roles
- Not used: the selected audio output is not used
- Main mix (all sources): the selected output outputs all audio processed in the display node
- Main mix at constant volume: the selected output outputs all audio processed in the display node at a constant volume, bypassing the volume slider in the user interface
AEC reference signal:
In order to perform acoustic echo cancellation (AEC) on the teacher microphone signal, an AEC Reference mix must be available in the AEC device (i.e. DSP, speakerphone, video conference unit, ...) If Digital audio mixing is enabled in your weConnect location, the AEC Reference signal is available at the output of the teacher camera manager display (as Main mix all sources).

USB Camera roles
The cameras that are connected to the devices can have specific roles:
- Idle: camera is not used
- Teacher Camera: camera is aimed at the presenter
- Room Camera: camera shows a view on the room/audience
- Teacher Content: content ingested into a display node via a USB connection (e.g. frame grabber)
- Document camera: camera used to view paper documents
- Auto-launched local source: this camera is use as a local source and is automatically launched at the start of the lecture or in huddle space mode
- Breakout camera: camera shown during breakout to the group joined by the host, unless broadcasting is selected. If no breakout camera is defined, the main teacher camera is chosen
- Other: use this for any USB content which does not have a specific function
The selection of role for these devices makes sure that weConnect knows where to send content to and how to process it depending on the use case the room is used in.

An audio input can be assigned to a USB camera. E.g. the 'clean' teacher voice to be added to the teacher camera stream.
Managing room configurations
Default configuration setting
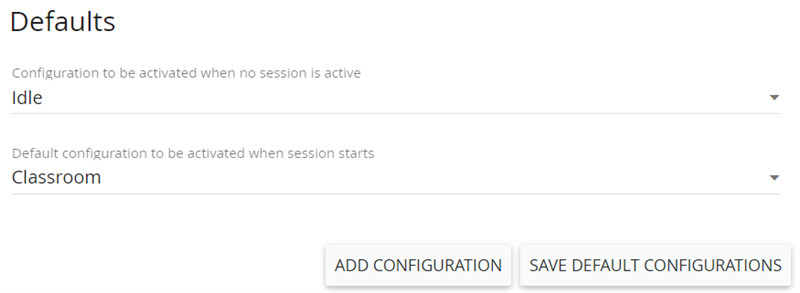
There are two default settings that can be modified in the Room configurations section. These can be modified by clicking on the dropdown and selecting another configuration. Click Save default configurations after you have applied changes.
- The first default defines the configuration when no lecture is active. It can be set to Idle or Huddle space (assuming a Huddle space has been configured). At fist startup of your institute, Idle is set.
- The second default indicates the room configuration when a lecture is created or started without modifying the type of it. And it is the configuration when an Ad-hoc lecture is started. At first startup of your institute, no configuration is set. The first room configuration that is created (except for huddle space), is selected as default.
Managing room configurations
Below the Defaults section you can see a list of room configurations that have been created:
- Idle is available by default
- Click Add configuration to create a new room configuration
- The selected room configuration has its name displayed in orange font. Select a configuration to display its configuration page below
- A crossed configuration name indicates a configuration that is not yet enabled. Select it and click Enable to enable it
- An exclamation mark in front of a configuration name indicates an invalid configuration. The validation problems are listed below
- The selected configuration can be removed by clicking Remove.

IDLE configuration
Room configuration Idle is present by default.
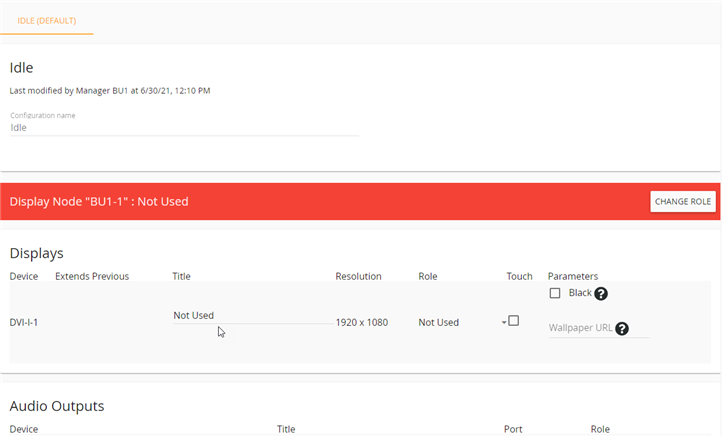
When there is no lecture ongoing and the default in that situation is set to Idle, the room is in Idle configuration. You can opt what is displayed on the display(s) in this use case: a black image, a wallpaper or HTML5 content.
Any HTML5 content can be selected by entering a Wallpaper URL pointing to a website. The webpage is loaded whenever the display node goes into idle mode. The URL is reloaded every time the system goes back into idle mode. It is possible to assign a different URL to each display in the room.
You can opt to make the display interactive by enabling the touch option in the Display section.
If you assign a role - e.g. Main mix(all sources) - to a speaker set connected to the same display node, the audio of the HTML page is audible as well.
Click Save at the bottom of the configuration page to store your settings.
Go to YouTube and select a video. E.g. https://www.youtube.com/watch?v=F7RJr4kiWdg (a Barco video).
Change the URL to make the video load full screen and play in a loop: https://youtube.com/embed/F7RJr4kiWdg?autoplay=1&loop=1&playlist=F7RJr4kiWdg.
Configuring a standard room
A standard room configuration such as Classroom, Lecture hall, (Interactive) Huddle space and even a Collaboration room consists of at least one Main node having one Main display connected. Additional devices can be added to enhance the experience for both host(s) and participants.
It is important to understand that room roles that are not valid prevent you from using the room. Correct invalid room configurations (indicated by an exclamation mark in a triangle).
Create a new room configuration
- Click Add configuration to create a new room configuration
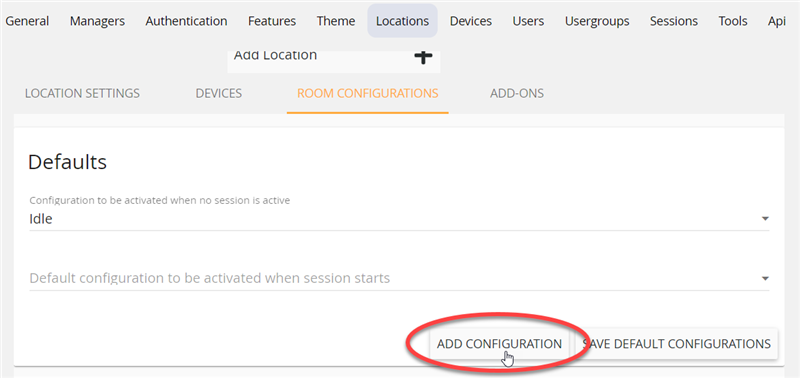
- Select the type (or role) of room you want to configure:
- it is added to the list of configurations
- it is selected
- its configuration page opens below
- Each red bar presents a display node. Click a red bar to open the configuration page of that node.
Set the display node role(s)
Choose a role for a display node by clicking Change role and selecting the desired role.
At least one Main node is required in a standard room configuration.
Configure the display(s)
The first tab in the configuration page of a display node is the configuration of the display. In this example, two screens are connected to a display node:
 The following parameters can be seen depending on the node role. Some of them can be set.
- Device: the title of the display. It cannot be changed and indicates to which output on the node it connects (e.g. DP-1)
- Extends previous: only available if more than one display is connected to the node. Is used to extend the content from the previous display to this one, or have all displays run independent content.
Extending screens is only possible if all output resolutions are the same - Title: by default the display role name is copied to this field. It can be overwritten by a custom title
- Resolution: displays the resolution of the connected display as set in the device configuration page. It cannot be changed from here.
- Role: select the role for the display. All room types need one Main node with a Main display defined. Other displays on the same node can be local confidence monitors, showing a copy of the content on the main display
- Touch: if the physical display is touch enabled, set the checkbox
- Parameters: depending on the display role, more parameters might need to be entered, e.g. display to clone, or wallpaper URL.
The Main node in a standard room configuration must have a Main display connected and configured.
Click Save at the bottom of the configuration page to store your settings.
Configure the audio input(s) and output(s)
The following parameters can be seen.
In standard rooms no audio devices might be connected to the devices. In that case you can skip these sections.
- Device: name of the connected audio input/output device
- Title: enter a custom title for the audio input/output device
- Port: description of the audio input/output device
- Role: choose a role from the drop down list
Click Save at the bottom of the configuration page to store your settings.
Configure the USB camera(s)
The following parameters can be seen.
For standard rooms that have no cameras installed, this section can be skipped.
- Device: name of the connected USB camera
- Title: a default title is given as a role for the camera is chosen. You can enter a custom title for the USB camera instead
- Role: choose a role from the drop down list
- Audio: select the audio input from which the signal should be added to the camera stream
- Favor detail above fps: set the box if resolution is more important than frame rate. Recommended for bird's eye cameras and cameras that film a white board or black board.
Click Save at the bottom of the configuration page to store your settings.
Choose wallpapers
The wallpaper that is used during the lecture when no content is shown on the display, is inherited from its parent, unless another wallpaper is uploaded and selected here. The process is similar to the wallpaper section in [KB7718]: Locations menu in the admin IU.
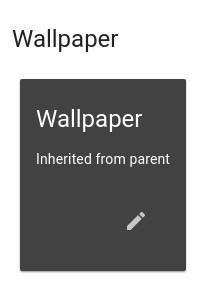
Click Save at the bottom of the configuration page to store your settings.
Configure additional display nodes (optional)
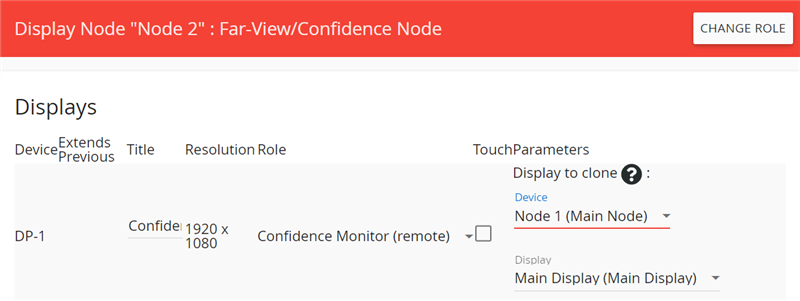
Add a device that shows a copy of the Main display
After setting up the Main node, we might want to have one more device that replicates the content of the Main node.
- On a device that is not used, click Change role
- From the drop-down list choose Far-view/Confidence node
- In section Displays, configure the display
- Set Role to Confidence monitor (remote)
- Optionally change the Title of the display
- Set parameter Device under Display to clone to Main node (i.e. the device that is configured as Main node)
- Set parameter Display under Display to clone to Main display (i.e. the display on the Main node that is configured as Main display)
- Optionally configure audio, camera and wallpaper
- Click Save at the bottom of the page
Add a device to be used as user interface
It is possible to configure a device or node with a touch enabled display as a UI node. This allows the teacher to control the weConnect lecture from the touchscreen. This touchscreen can be a large display or a small tabletop touchscreen monitor.
When a teacher starts a lecture, the UI node automatically logs in with the teacher credentials and presents the UI according to the configured settings. The teacher can then use the UI alongside the weConnect UI on his/her BYOD.
- On a device that is not used, click Change role
- From the drop-down list choose Far-view/Confidence node
- In section Displays, configure the display
- Set Role to User interface (touch display)
- Optionally change the Title of the display
- Set checkbox Touch
- Set parameter Page/tab to the Display control (i.e. the device that is configured as Main node)
- Set checkbox Interactive to show the navigation buttons that allow to select the tabs in the teacher UI shown on the display
- Click Save at the bottom of the page
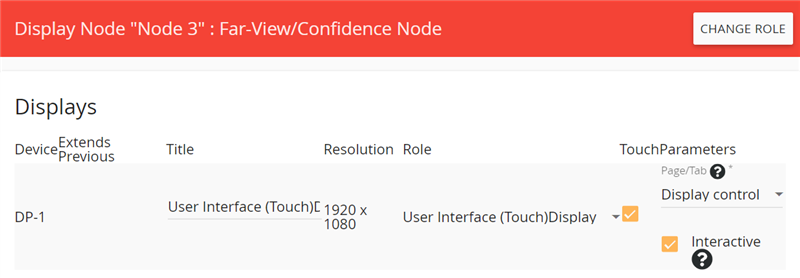
It is also possible to show a different tab of the teacher UI at the startup of the UI node. These are the options:
- Display control
- Polls & quizzes
- Silent questions
- Whiteboard


